Total Pageviews

Showing posts with label tip. Show all posts

Tuesday, December 8, 2009

Tip # 18

This is a little spin-off from yesterday's tip. When you laminate different colours of clay to make a mokume gane, the results will differ depending on what colour is on top.
Yesterday, I made a sheet of clay with green, blue and fuchsia layers. I had enough clay to cut my layered sheet in two. The first textured sheet I shaved was green on top, blue and fuchsia and I got the result seen in yesterday's post. I then proceeded to use the second half of the sheet with fuchsia on top, blue and green.
This is what happened when I shaved off the textured fuchsia layer:

Le truc d'hier m'a inspiré celui d'aujourd'hui. Quand on lamine différentes couleurs pour faire un mokume gane, les résultats vont varier dépendant de la couleur qui se retrouve sur le dessus.
Par exemple, hier j'ai laminé une feuille de pâte avec du vert, du bleu et du fuchsia. J'ai coupé ma feuille en deux. J'ai fait les découpes sur la face verte texturée. On peut voir les résultats dans l'entrée d'hier. J'ai ensuite utilisé l'autre moitié de ma feuille laminée que j'ai retournée et j'ai fait les découpes sur la surface texturée fuchsia: voici ce qui est arrivé:


As you can see, the colours are different.

Évident mon cher Watson, les couleurs sont ne sont pas pareilles.


Well finally, the best way is to compare them; so I just took this picture:

Bon alors, je me suis rendue compte que la meilleure façon de les comparer est de prendre une photo...


So when you are making a mokume gane, you might want to try both sides to see what you like best....

Conclusion: quand vous faites un mokume gane, il est bon d'essayer les deux côtés pour voir celui que vous préférez....

Monday, December 7, 2009

Tip# 17

I love texturing clay in any way possible. This morning I wanted to make covers for a book because I have leftover scrap paper. I conditioned this horribly dry blue clay (with feet and stomping) and layered it with bright green and fuchsia clay. Looked around for stuff to texture and found these on my work table:

J'aime appliquer des textures à la pâte. Ce matin, je voulais faire des couvercles pour un livre parce que j'ai des restants de papier qui trainent. J'ai conditionné de la pâte bleue très sèche (les pieds aidant) que j'ai laminée avec de la pâte verte pâle et un peu de pâte fuchsia. J'ai fouillé sur ma table de travail (éternellement en désordre) et j'ai trouvé ceci:


An original texture made with an old pencil nib, two pen caps (I forgot to photograph the star one) and some coffee stirrers which I cut and baked in a lump of clay and finally a nail head I found some time ago.

Ca donne une texture originale fabriquée avec: un bout de crayon à mine, un couvercle de plume à bille (j'ai oublié d'inclure l'embout étoilé d'un crayon de feutre dans ma photo), une tête de clou texturée et une tige plastique pour brasser le café que j'ai coupé, enfoncée dans une boule de pâte et cuite.


And it ended up like this.
Voici le résultat.


Now, off to make the book.
Bon, maintenant faut fabriquer le livre...

Tuesday, November 24, 2009

Tip # 11

Does this ever happen to you? Does it make you happy? I have a lot of old clay, very old clay. When I pass it through the pasta machine it looks like this! Please don't throw it away : there is a solution to your problem.
Est-ce que ceci vous arrive parfois? Aimez-vous ça? Ne jetez pas ces petites crottes: il y a une solution.

First of all you will need a few tools: easy to find, I guarantee you have them all. A plastic baggie to put those crumbs in. A good pair of shoes, yourself in those shoes (for once, the heavier the better), and that is about it...oh yes... patience.
Tout d'abord, vous aurez besoin de quelques outils que vous possédez. Un petit sac de plastique pour placer les granules. Une bonne paire de souliers, vous-même dans les souliers (pour une fois, le plus lourd le plus efficace he he), oh oui, puis, un peu de patience.

Take all the crumbs, put them in a baggie and squish them together to form a ball.
Prenez les granules, mettez-les dans le sac et ecrasez-les pour former une boule.

Then, put your shoes on and step on the clay inside the baggie. Keep on stomping till you have a flattened lump.
Mettez vos souliers et pilez sur le sac pour aplatir la boule de pâte.


Take that lump and halve it, put it back in the bag and step and stomp: use your heels also. You will get a good workout for your feet. Repeat the folding of the clay and stepping. Do this for a few times. You also do a few bending exercises. Better be positive!
Prenez la boule aplatie, coupez-la en deux replacez-la dans le sac et pilez encore dessus avec force et conviction. Faites ça plusieurs fois. Utilisez vos talons et les deux pieds: ça donne un bon massage. Et puis, il faut se pencher; un peu d'exercice ne fait pas tort. Vaut mieux avoir une attitude positive!!

Remove it from the plastic bag and roll it till it is about the the same thickness as the largest setting on your pasta machine. No use stressing your pasta machine.
Ensuite, roulez la plaque avec votre rouleau pour qu'elle puisse passer facilement dans votre machine à pâte.


Once you pass it through the largest setting on the pasta machine, roll it through the next thinner setting without folding, and then the next, and then the next etc. You can then fold it and pass it through the next largest setting and proceed till you reach the largest setting. It should then be possible to fold and condition normally. The clay will still be stiff but usable. If you want a softer clay, mix the crumbly clay with some new or soft clay right at the beginning i.e. in the baggie. Important: work with small amounts of clay and then combine the conditioned sheets.
Une fois passée dans la machine réglée à la plus grande épaisseur, sans la plier, passez-la dans la prochaine position plus mince et continuez ainsi plusieurs fois. La feuille sera assez mince. Ensuite pliez-la et remenez-la vers les positions plus épaisses en la pliant à chaque fois. Une fois rendue à la position plus épaisse de votre machine, pliez votre pâte et conditionnez-la comme d'habitude. La pâte sera tout de même raide mais utilisable. Si vous voulez une pâte plus malléable, mélangez les granules avec de la pâte plus molle dès le début c.-à-d. dans le sac. Important: travaillez avec de petites quantités puis, une fois conditionnées, combinez-les.


Because all of this is so boring, here is a picture of what I encountered on this late November morning. I just love it when there is no wind.
Parce que tout ceci est d'un ennui mortel, je termine avec une photo prise ce matin lors de ma marche quotidienne. J'aime tellement ça quand il n'y a pas de vent!

Thursday, April 16, 2009

Tip # 31

Actually the thirty other ones are in my head somewhere!

Les trente autres trucs sont en quelque part dans ma tête.

This one is all about shaving off thin slivers of clay from a sheet of clay.
You can use this tip for the mokume gane or the mica shift techniques.
For making a mokume gane, you usually stack up different colours of clay laminate them into one sheet and then make an impression upon this sheet with a texture or other texturing tools. As for the mica shift, you use a metallic clay (gold works best for me) and impress textures on the clay sheet.
To get the mokume gane effect, you have to shave off a very thin layer of clay and the colours in the underlying layers will appear. For the mica shift, I think that breaking the surface tension will bring out the mica shift effect (or 3-d or hidden image) to the surface. I love playing around with both of these techniques.

J'utilise ce truc avec le mokume gane ou pour faire ressortir les images cachées quand on imprime une texture sur une feuille de pâte métallisée.

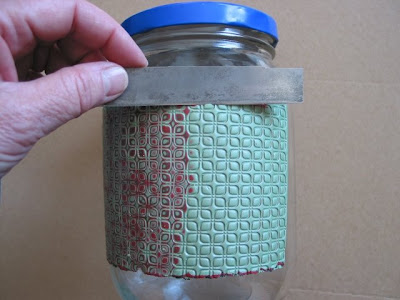
Now for the tip which works for me. Instead of curving your blade to do the shaving of thin slivers, I like to curve the polymer clay sheet and use a straight blade. To give my clay sheet a gentle curve, I place it on a large jar (or it could be an ice cream container). Why do I like this method?: it is because the curve is always the same, and which makes the shaving part more precise and easy: more control in the shaving process. Here is a picture of my usual set up. I usually use both hands to hold my blade but my other one was taking a picture....

Au lieu de recourber la lame pour enlever une tranche minime de pâte à la surface, (les courbures de la lame ne sont pas toujours pareilles et parfois une mini fausse manoeuvre a pour résultat qu'on a trop pris de pâte, je préfère donner une légère courbure à la pâte.


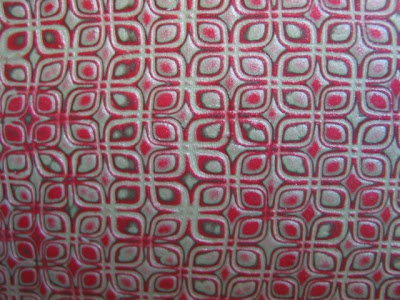
And this is what you get:
Ce qui donne ceci:


Presently, I am working on book covers for a class that I will be giving at our annual polymer clay gathering in Morrisburg Ontario and I need samples of different stages of completion. I have been playing around with the layering/texturing technique which gave me the idea to share this tip.
C'est en préparant mon cours d'assemblage de livre que m'est venue l'idée de partager ce truc car récemment j'ai travaillé ces techniques.


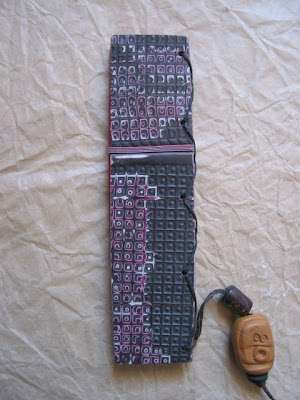
It is possible to be more creative with this and bring it to another level. On the back cover of the blade holder below, I played around with the texture and the result after it was shaved. Many possibilities lurking around the corner don't you think?
Il est possible de pousser la créativité encore plus loin en combinant la texture originale avec le résultat de la découpe. C'est ce que j'ai fait sur le couvercle d'un porte-lames. Qui sait, vous aurez peut-être le goût d'explorer!!!


Who knows, you might take it yet to another level!!!

LinkWithin

Related Posts with Thumbnails